ST60, ST60+, i60 Analog Wind/Rudders: Angles Display Differently on Different Screen
Digital Skipper |16/04, 2024
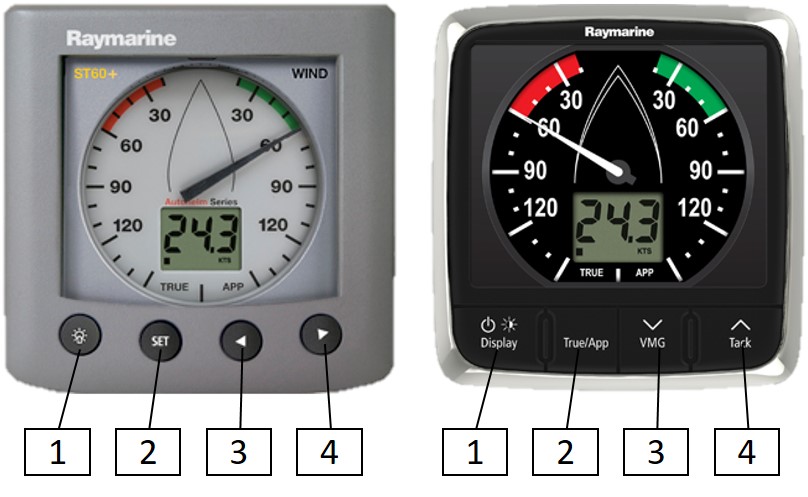
Assuming your products display the same data type (e.g., both set to apparent wind or both to true wind) from the same source sensor, the problem lies in the analog instrument's pointer calibration (if you compare two analog displays, both can be incorrect, not just the one that seems to show the problem).
This is not the same as wind (or rudder, compass) angle adjustment calibration (standard part of the installation setup), but a low-level, factory/self-test calibration that is not documented in the manual. What happens is that there is a difference between what the analog display thinks is the wind angle (etc.) and where the pointer actually points.
We often find that we have to convince people that this diagnosis is correct, people tend to instinctively blame the receiving rather than the sending display, but this was actually a fairly common problem with ST60 and ST60+ (and sometimes happens with i60) displays that we have seen many times.
It is almost impossible for one display to send a correct wind angle and another to receive and read it consistently incorrectly: the networks have error checking to ensure this does not happen. It is possible for a display to receive a value and show something else due to a software bug, but we are not aware of any cases where this happens: if you find one, please let us know.
Solution / Procedure
You need to recalibrate the display's data for the pointer's current position using the self-test procedure (below).
Here you will cycle the display through a series of pointer angles shown in 30-degree steps on the LCD screen. In each case, you move the pointer clockwise/counterclockwise until the pointer shows the same angle as the number displayed on the screen. We suggest you go around 3 times: once to adjust, a second time to fine-tune, and a final time to check.
- To start the calibration procedure, press Button 1 and Button 4 together for 4 seconds. When the unit beeps, immediately press Button 3 and Button 4 together briefly. The unit enters self-test step 1. (Note: To perform pointer calibration, you must skip self-test 1 and 2 and go to step 3)
- Press Button 1 and Button 2 together briefly to proceed to self-test step 2.
- When the pointer has made at least 1 full rotation, press Button 1 and Button 2 together briefly to proceed to self-test step 3.
- This step is to set the pointer's offset and corrections. Upon entry, the LCD screen displays T3 and then indicates the position to which the pointer should be placed to adjust for the pointer's offset. Brief presses of Button 1 rotate the pointer clockwise to adjust with the large degrees. If there is any misalignment, repeatedly press Button 3 for counterclockwise or Button 4 for clockwise adjustment until correct alignment is achieved on all large degrees.
- To exit the self-test and store pointer corrections, press Button 1 and Button 2 together for 2 seconds.