Svenska
 Dansk
Dansk
 Suomi
Suomi
 Español
 Deutsch
 Français
 Italiano
 Nederlands
 Polskie
 Norsk
Norsk
Cart
Your cart is empty, but doesn't have to be..
Discount: 0.00 EUR
Digital Skipper |26/04, 2024
Conflicts between data sources can often show symptoms such as NO AIS or NO FIX on the Raymarine system. These problems are often due to incorrect configuration of data sources or communication protocols. Follow this guide to identify and resolve the issues.
When the system has more than one source for the same type of data (GPS, wind, depth, etc.), the Data Sources function must be used to specify which source to use. This is crucial to avoid data conflicts.
Verify that:
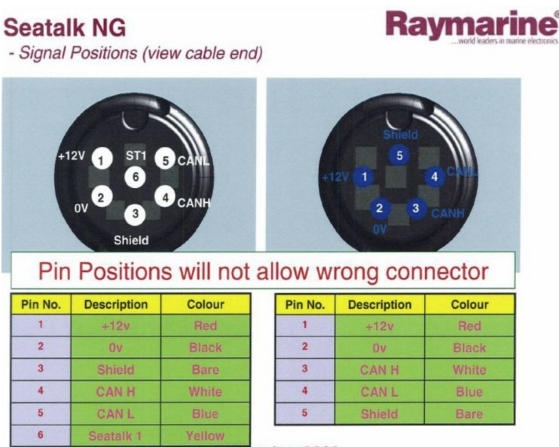
If you have an AIS350, AIS650 or AIS500, ensure that the device is only connected via one communication protocol – either SeaTalkng (preferred) or NMEA 0183, but not both simultaneously.
If the problem persists, fully charge the vessel's batteries and try to duplicate the fault while the system is connected to shore power. If the fault does not occur under these conditions, the problem is likely due to insufficient power.
Actions to improve power supply:
If the problem persists even with shore power, check the backbone for:
Tip: Check the resistance between CAN_H and CAN_L on the termination plugs – it should be 120 ohms.
If the resistance is not as expected, remove devices one by one until the faulty device is found. Then send it to the Raymarine service center for bench testing.